Next
Next

When you select the Microsoft PowerPoint option in the Export Tables dialog box, a number of additional options become available. To use this option, you need to have Microsoft Office 2007 or later installed on your desktop machine. Considering that PowerPoint Export relies on the Microsoft Excel component, you should close all Excel files (to avoid an invalid export result) prior to starting the export.
Note that by default, tables are exported to PowerPoint as charts.
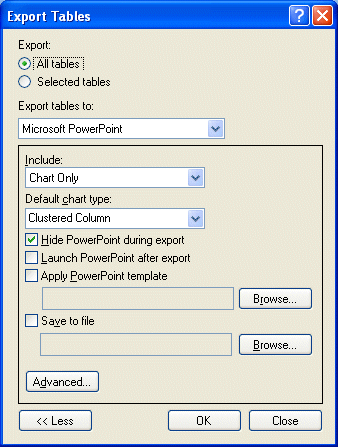
Include. Use this option to specify whether the export should create charts only, tables only, or both tables and charts, and whether the chart or the table should be shown first. Note that the tables and charts are created using Microsoft Excel, so you need to have both PowerPoint and Excel installed to be able to use these options.For details of the way in which you can display data in charts, see Displaying Results in Charts.
Default chart type. Select a chart type from the drop-down list. If you want to use a custom chart that you have created in Excel, type in the name of the custom chart.
Note: The chart type you select is used only if you have not specified a chart type for a table using the Table Properties dialog box.
Hide PowerPoint during export. Select this option to hide PowerPoint during the export. This makes the export faster.
Launch PowerPoint after export. Select if you want IBM® SPSS® Data Collection Survey Reporter to automatically launch PowerPoint and open the file that contains the exported table(s).
Apply PowerPoint template. If you want to use a PowerPoint template other than the default, choose the Browse button and select another template to attach to the PowerPoint file. By default, PowerPoint templates are stored in subfolders under a Microsoft Office templates folder, for example, C:\Program Files\Microsoft Office\Templates\Presentation Designs and have the file extension .pot.
Save to file. Check this box and enter a name and location for the output file, or choose the Browse button to browse to the folder where you want to save it. If you do not specify a save location, and the Launch after export option is also not selected, you are prompted to either launch the associated application or select a save location.
Choose the Advanced button to view or edit the Advanced PowerPoint Export Properties dialog box.
Display Properties:
Variable. Choose whether to use variable names or the more friendly descriptions for the variable texts in the tables.
Category. Choose whether to use category names or the more friendly descriptions for the row and column headings in the tables.
Title slide. When you export to PowerPoint a title slide is created automatically. If you do not want to include the title slide, deselect this box.
Headers. Select this option to include any headers attached to the table in the PowerPoint slides.
Footers. Select this option to include any footers attached to the table in the PowerPoint slides.
Chart Properties:
Chart series. Choose whether you want the table rows or columns to form the chart series. If you select the Chart category elements or Chart special elements box, ensure that the orientation of the categories or special items (in rows or columns) corresponds to the setting entered here. For example, to create a chart for a mean that appears on the top of a table, choose as columns.
Chart category elements. You can optionally create charts for individual categories, for individual variables, or for all variables on the table. Select:
• Per element to create a separate chart for each category in the variable(s).
• Per variable to create a chart for each variable(s).
• Per table creates a single chart for all variables on the table.
Chart special elements. You can optionally create charts for statistical items (such as the mean, minimum value, standard deviation, etc.). Select:
• Per element to create a separate chart for each statistical item in each variable.
• Per variable to create a chart for all statistical items in each variable.
• Per table creates a single chart for all statistical items in all variables on the table.
Base chart on. If you want to base charts on a cell item other than the default, select the cell item from the drop-down list. The cell item must be included in the table.
Display series base. Select this option to display the base for the chart series in the legend for the chart.
Display base for last series category. Check this box to display the base for the last data point in the chart legend. This option is applicable only when charting special items. If the count cell item is present, this is used. If not, the unweighted count cell item is used.
Display column statistics results. Displays the column IDs for a column proportions or column means test next to the category descriptions, and adds the column proportions test results to the chart above the relevant columns.
Chart percentages using scale of 0 to 100%. Check this box if you want percentages to be charted on a scale of 0 to 100%. If this option is not selected, the scale is based on the biggest value in the chart.
Table Properties:
Borders. Select this option if you want tables to have borders in PowerPoint.
Wrap description text. Select this option if you want to wrap long descriptions onto the next line.
Auto-fit column widths. Select this option if you want to automatically change the width of the table columns to accommodate the width of the text. By default, this option is not enabled.
 Click to see a
picture of the Export Tables dialog box with Microsoft PowerPoint
selected
Click to see a
picture of the Export Tables dialog box with Microsoft PowerPoint
selected Click to close the picture