
 Next
Next

This topic provides information about creating a IBM® SPSS® Data Collection Interviewer Server Administration project that uses data that is not part of an IBM® SPSS® Data Collection Interviewer Server project. For instructions on creating a new questionnaire project, see Creating a New Questionnaire Project.
Every project has a name and an ID. The name is the name by which the project will be identified in Interviewer Server Administration. It is for display purposes only and you can change it at any point in the project's life cycle. The ID is the name that the Interviewer Server Administration activities will use when creating files associated with the project, so it is usual to make it the same as the project name if possible. Once the ID has been set you cannot change it even if you change the project name.
Because the project ID is used in filenames it has to be something that is valid for filenames. The rules are these:
• The ID must be unique.
• It must start with an English letter (A to Z, a to z).
• The rest of the name may contain English letters and the digits 0 to 9.
If the project name meets these criteria, Interviewer Server Administration uses it as the project ID (you can change this if you wish). If not, Interviewer Server Administration copies the name and then makes the following changes in an attempt to make it acceptable. Once an acceptable ID emerges, no further changes are made.
1. Remove invalid characters (non-English letters or punctuation, for instance). If this results in a zero-length ID, Interviewer Server Administration generates an ID based on your user name as described below.
2. If the ID starts with a number Interviewer Server Administration inserts the letter A at the start of the ID.
3. If the ID is longer than 64 characters it is truncated to that length.
4. If the ID is not unique Interviewer Server Administration appends a number in the range 1 to 999. Numbers are chosen in sequence starting with 1 so this allows for 999 files with the same root to the filename (ID_1 to ID_999, for instance). If adding a number would make the ID longer than 64 characters, Interviewer Server Administration removes characters from the end of the ID before appending the number.
If none of these changes results in a valid project ID, Interviewer Server Administration generates an ID based your user name and the date and time, modifying it to produce a unique and valid ID if necessary — for example, ben0501191226.
Note: When customer accounts are employed, the generated ID is prefixed by the customer account name (for example, customeraccountname_ben0501191226).
To Create the New Project in Interviewer Server Administration:
► Make sure that your data files are ready for uploading. See the topic Preparing Your Data Files For Uploading for more information.
► On the toolbar at the top of the My Projects list, click the New Project button:

This opens the New Project dialog box.
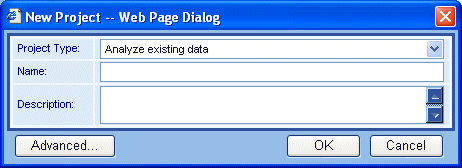
► From the Project Type drop-down list, select Analyze existing data.
► In Name, enter the project's name as you want it to appear in the project list.
► In Customer Account, select a customer account for the project. If you are not using customer accounts, select the System account.
► Optionally, in Description, type a more detailed description of the project.
► If you want to do any of the following, click Advanced. If not, click OK to create the project using the default settings.
• Specify additional project details such as the project ID or the project folder.
• Specify which roles may access the project. The default is for only the creator and members of the DPMAdmins and CustomerAccountAdmins roles to have access.
► To specify additional project details, select the Project tab.
► If you do not like the Project ID that Interviewer Server Administration has chosen, enter the name that you want to use as the basename for all files associated with this project.
► Click Check to verify that the name you have chosen is valid.
► The Project Folder field allows you to group projects using characteristics of your choice. How you use this field depends on your permissions.
• Everyone can choose an existing folder name to place the project in that folder, or <Top level> to create a project in the top level of the project hierarchy.
• If you have permission to manage project folders, you may choose <Create new folder> to place the project in a new folder with a name of your choice (enter the folder name when prompted to do so).
Note: The hierarchical project list is a display feature only. It does not create a hierarchical structure on the disk. All projects are created in your user folder (for example, in Users\ben\Projects) even if they are displayed as being in a folder in the project list.
► To specify which roles may access the project, select the Permissions tab and then select roles as appropriate.
► Click OK to close the Advanced dialog box and then click OK again to create the project.
This opens the Upload Existing Data dialog box.
► In Data Type, select the type of data you will be uploading.
► In File to upload, click Browse. Then browse to where your data files are located and double-click the file you want to upload. The file begins to upload immediately. When the upload is complete, the name of the file appears in the File(s) uploaded list.
You can upload only one file at a time, but when each file has been uploaded, you have the option to upload another one. If you upload a .zip file, Interviewer Server Administration automatically unzips the file and deletes it when the upload is complete.
► After uploading an .mdd file whose name is different from the project ID, you will be asked whether you want to change the name of the .mdd file to match the project ID. Select Cancel.
► If you want to check that Interviewer Server Administration can connect to the data files you have uploaded, click Test Connection. In most cases the connection will work straight away and you will see a message confirming this. If the connection fails, you will need to use EditProject to change the connection properties.
► Click Finish.
This creates the project and adds it to the list of Interviewer Server Administration projects.